
While previously watching another pincushion challenge going around blogland, I was motivated by the dilapidated condition of my own favorite wrist pincushion, to make a new one and this time take photos of the process!
I especially love this creation, which I designed several years ago, because it also works as a wrist protector/support band for my over-used wrist and its issues ;)
It can be made with either one very wide piece of elastic inserted inside or with channels that hold several thinner rows of elastic (like I had - pardon the pun - on hand) to use here.

Step 1:
Before you begin, it is best to not only assemble supplies but also draw a pattern based on your own wrist measurement. I am small boned and my wrist measures 5 1/2" around so my pattern is based on simply doubling my own wrist measurement or a size small band to be cut at 11" long and about 3 1/2" wide. Make yours both wider and longer for larger sizes.
(Enlarge photo to see other measurements.)
Supplies needed for the band are:
Supplies needed for the band are:
1/4yd of fabric
1/2" to 3" wide elastic strips as desired, cut to 3/4 the length of your pattern piece (for stretching and supporting purposes)
bias trim to be uses as an exterior edge binding
velcro or other hook and loop tape
Supplies needed for the small attached pincushion section are:
a small piece of fabric 3 1/2" to 4 1/2" square, front and back
and either a large magnet (mine came from the inside of a broken magnetic pin holder) or a wad of polyester fluff or leftover batting to place inside of the pincushion.
Step 2: Make the small pincushion by sewing cut squares of fabric, right sides together, leaving a small opening for turning. Stuff with either the fluff, or a large magnet with some fluff on its sides, but not covering its magnetic surface. (If you want decorative rick rack (as I did) it can be added before you sew this seam ,to show once it is turned) Then turn pincushion section, right sides out.
Step 3: Make the band by sewing two band strips right sides together at long edges, turn right side out and then stitch channel seams down the length based on whatever width your elastic and number of channels are. I used an assortment to show you can use whatever you might have.

Step 4: Insert the elastic into the casings, pulling through with a bodkin or safety pin and anchor ends with stitching. Trim ends outside of stitching.

Step 5: Cut velcro to size and stitch down, one piece at each oppoing side.
Rememer the loops will be on one side (front or back) and the hooks on the opposite side (back or front) Try on before you do the final stitching to make sure you do this correctly ;)

Step 6: Attach the stuffed pincushion at this point, after hand sewing its opening closed, and then simply hand sew it to the band. If you wish you can also very carefully machine sew it to the band, but it's a bit trickier.

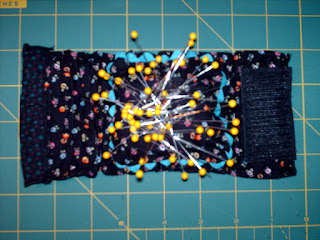
Magnetic version above

Stuffed with polysilicon or sawdust, rice, or broken walnut buts or even cut human hair (natural oils of hair actually are helpful to smooth pin insertion into fabric!)
Step.7:
Your wrist pincushion is done! If it's magnetic, like mine, you can toss a few pins on top, or let it 'take a dip' into the pins for a refill. You can also make a co-ordinating band (minus the pincushion) for the opposite wrist giving you dual wrist support and a nice stylish appearance ;)
If you prefer, leave the magnets out, add more fluff and use in the traditional form!
5 comments:
Stylish indeed! :)
Thanks for the tutorial. I haven't used a wrist pincushion, but I bet one would be useful for handwork. I may have to give it a try.
What a great pincushion--thanks for the pattern!
I love my wrist pincushion and like yours it is getting in sad shape. I recently saw one that was made with velcro that you put on your wrist like a bracelet. Love you new pincusion.
If you are not using a magnet inside the cushion, it is quite good to insert a small piece of firm but flexible plastic at the base of the pincushion before stuffing. That way you won't stab yourself when putting pins into the cushion.
Many thanks for this quick and useful project. I have been in such a worried state because I'm meeting with my craft group in two days and only just realised that one lady, who has become a very good friend in this last year, has a birthday tomorrow! What can I make in just one evening? This perfectly wonderful and useful wrist pin cushion! Thank you soooo much :D
Post a Comment